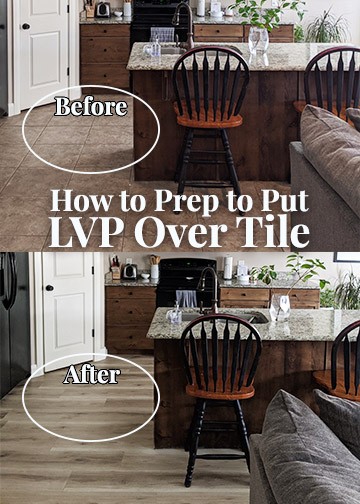
We really wanted LVP (luxury vinyl planking) instead of our builder-grade tile. But we also didn’t want to spend a bucket of money to do it. So, after getting bids from flooring companies, my husband and I decided to lay the LVP ourselves. Over our tile.
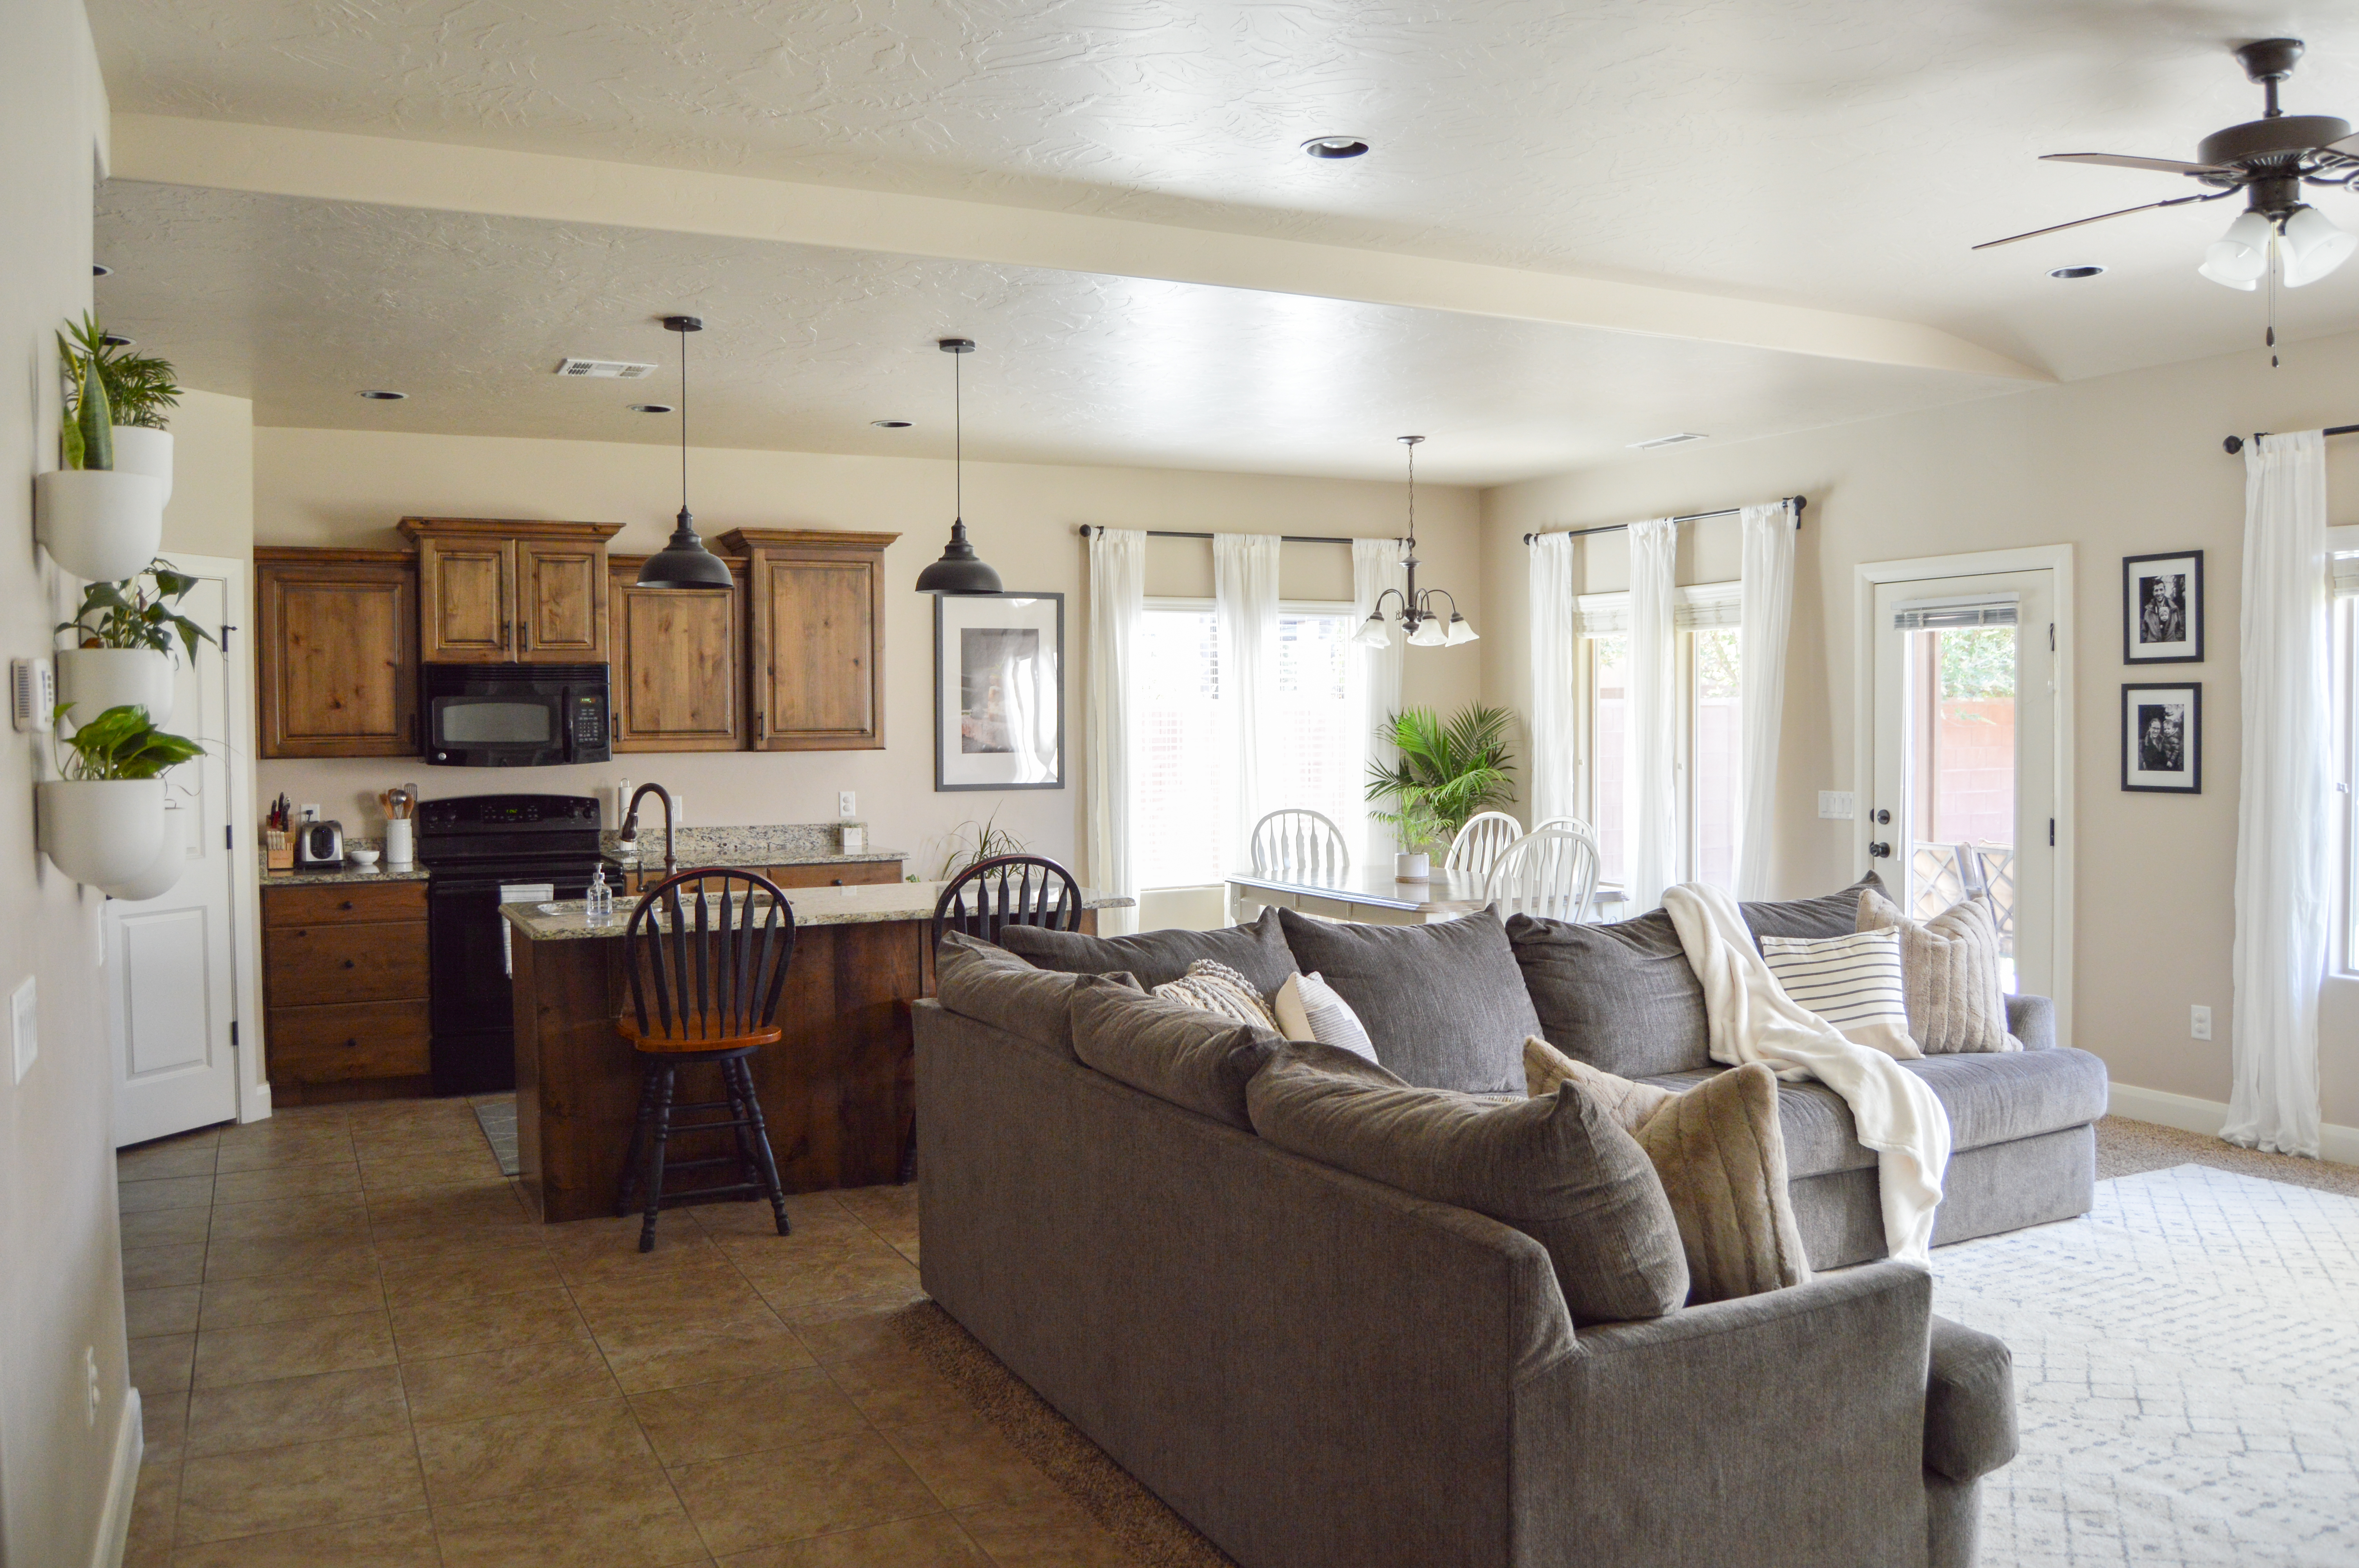
(In the picture below you can see where we started. We had the builder-grade tile and a carpet pad–see it under the rug?–in the living room. For a seamless look, we wanted LVP to cover this whole area plus in the entry hallway, laundry room, and nook before the master bedroom. Basically most of the common spaces.)
(This post on how to prep for LVP flooring over tile contains affiliate links that I may be compensated for. Your clicks and purchases help support The DIY Lighthouse at no extra charge to you.)
Why did we put LVP over tile?
Why did we put LVP over tile? Well, first of all, our toddlers were away at my mom’s house for one week so we had a tight deadline to deal with. Demoing can take a while, so skipping that step would save us a bunch of time. Second, demoing makes a giant mess. We still had our baby with us and didn’t want her breathing in a bunch of demo dust. Third, (and the biggest reason) was cost. If we weren’t willing to do the demo ourselves we could have paid someone to do it for us, but that just seemed like a lame way to spend a bunch of money. We decided to go the thrifty route and just lay the LVP over our tile.
My husband, Jake, and I figured that by trying to put LVP over tile ourselves the worst thing that could happen is we would waste our time. If it didn’t work out we could pull up the LVP and pay someone to come install it for us. We wouldn’t be wasting money. With that in mind we went for it!
FYI, everywhere we got a flooring bid from we asked if they would be willing to lay the flooring for us without demoing. Every single place said they wouldn’t lay over tile. They didn’t want to be responsible for any unevenness in the flooring, etc.
Can you put LVP over tile?
So if you’re asking the question, “Can I put LVP over my tile?” My answer is… maybe? I think it’s up to you and if you want to take that risk. Obviously that is more of a risk for having your LVP end up uneven if you have uneven tiles. If your tile is pretty smooth and there aren’t huge unevenness problems or cracked tile problems then I think you could probably do it! (But I’m a total amateur so consult someone who can give you official advice based on the condition of your tile.)
By doing any DIY job you assume some risk because you’re not paying a pro to come do it. (Unless you are a pro… but if you’re reading this I’m guessing you’re not haha.) So as a DIY blogger I say it’s probably worth trying! 🙂
How to Prep Tile Flooring for LVP
If you’ve decided you want to lay LVP over your tile like we did, here are some steps you’ll want to take to ensure that you’ve prepped and are ready to go.
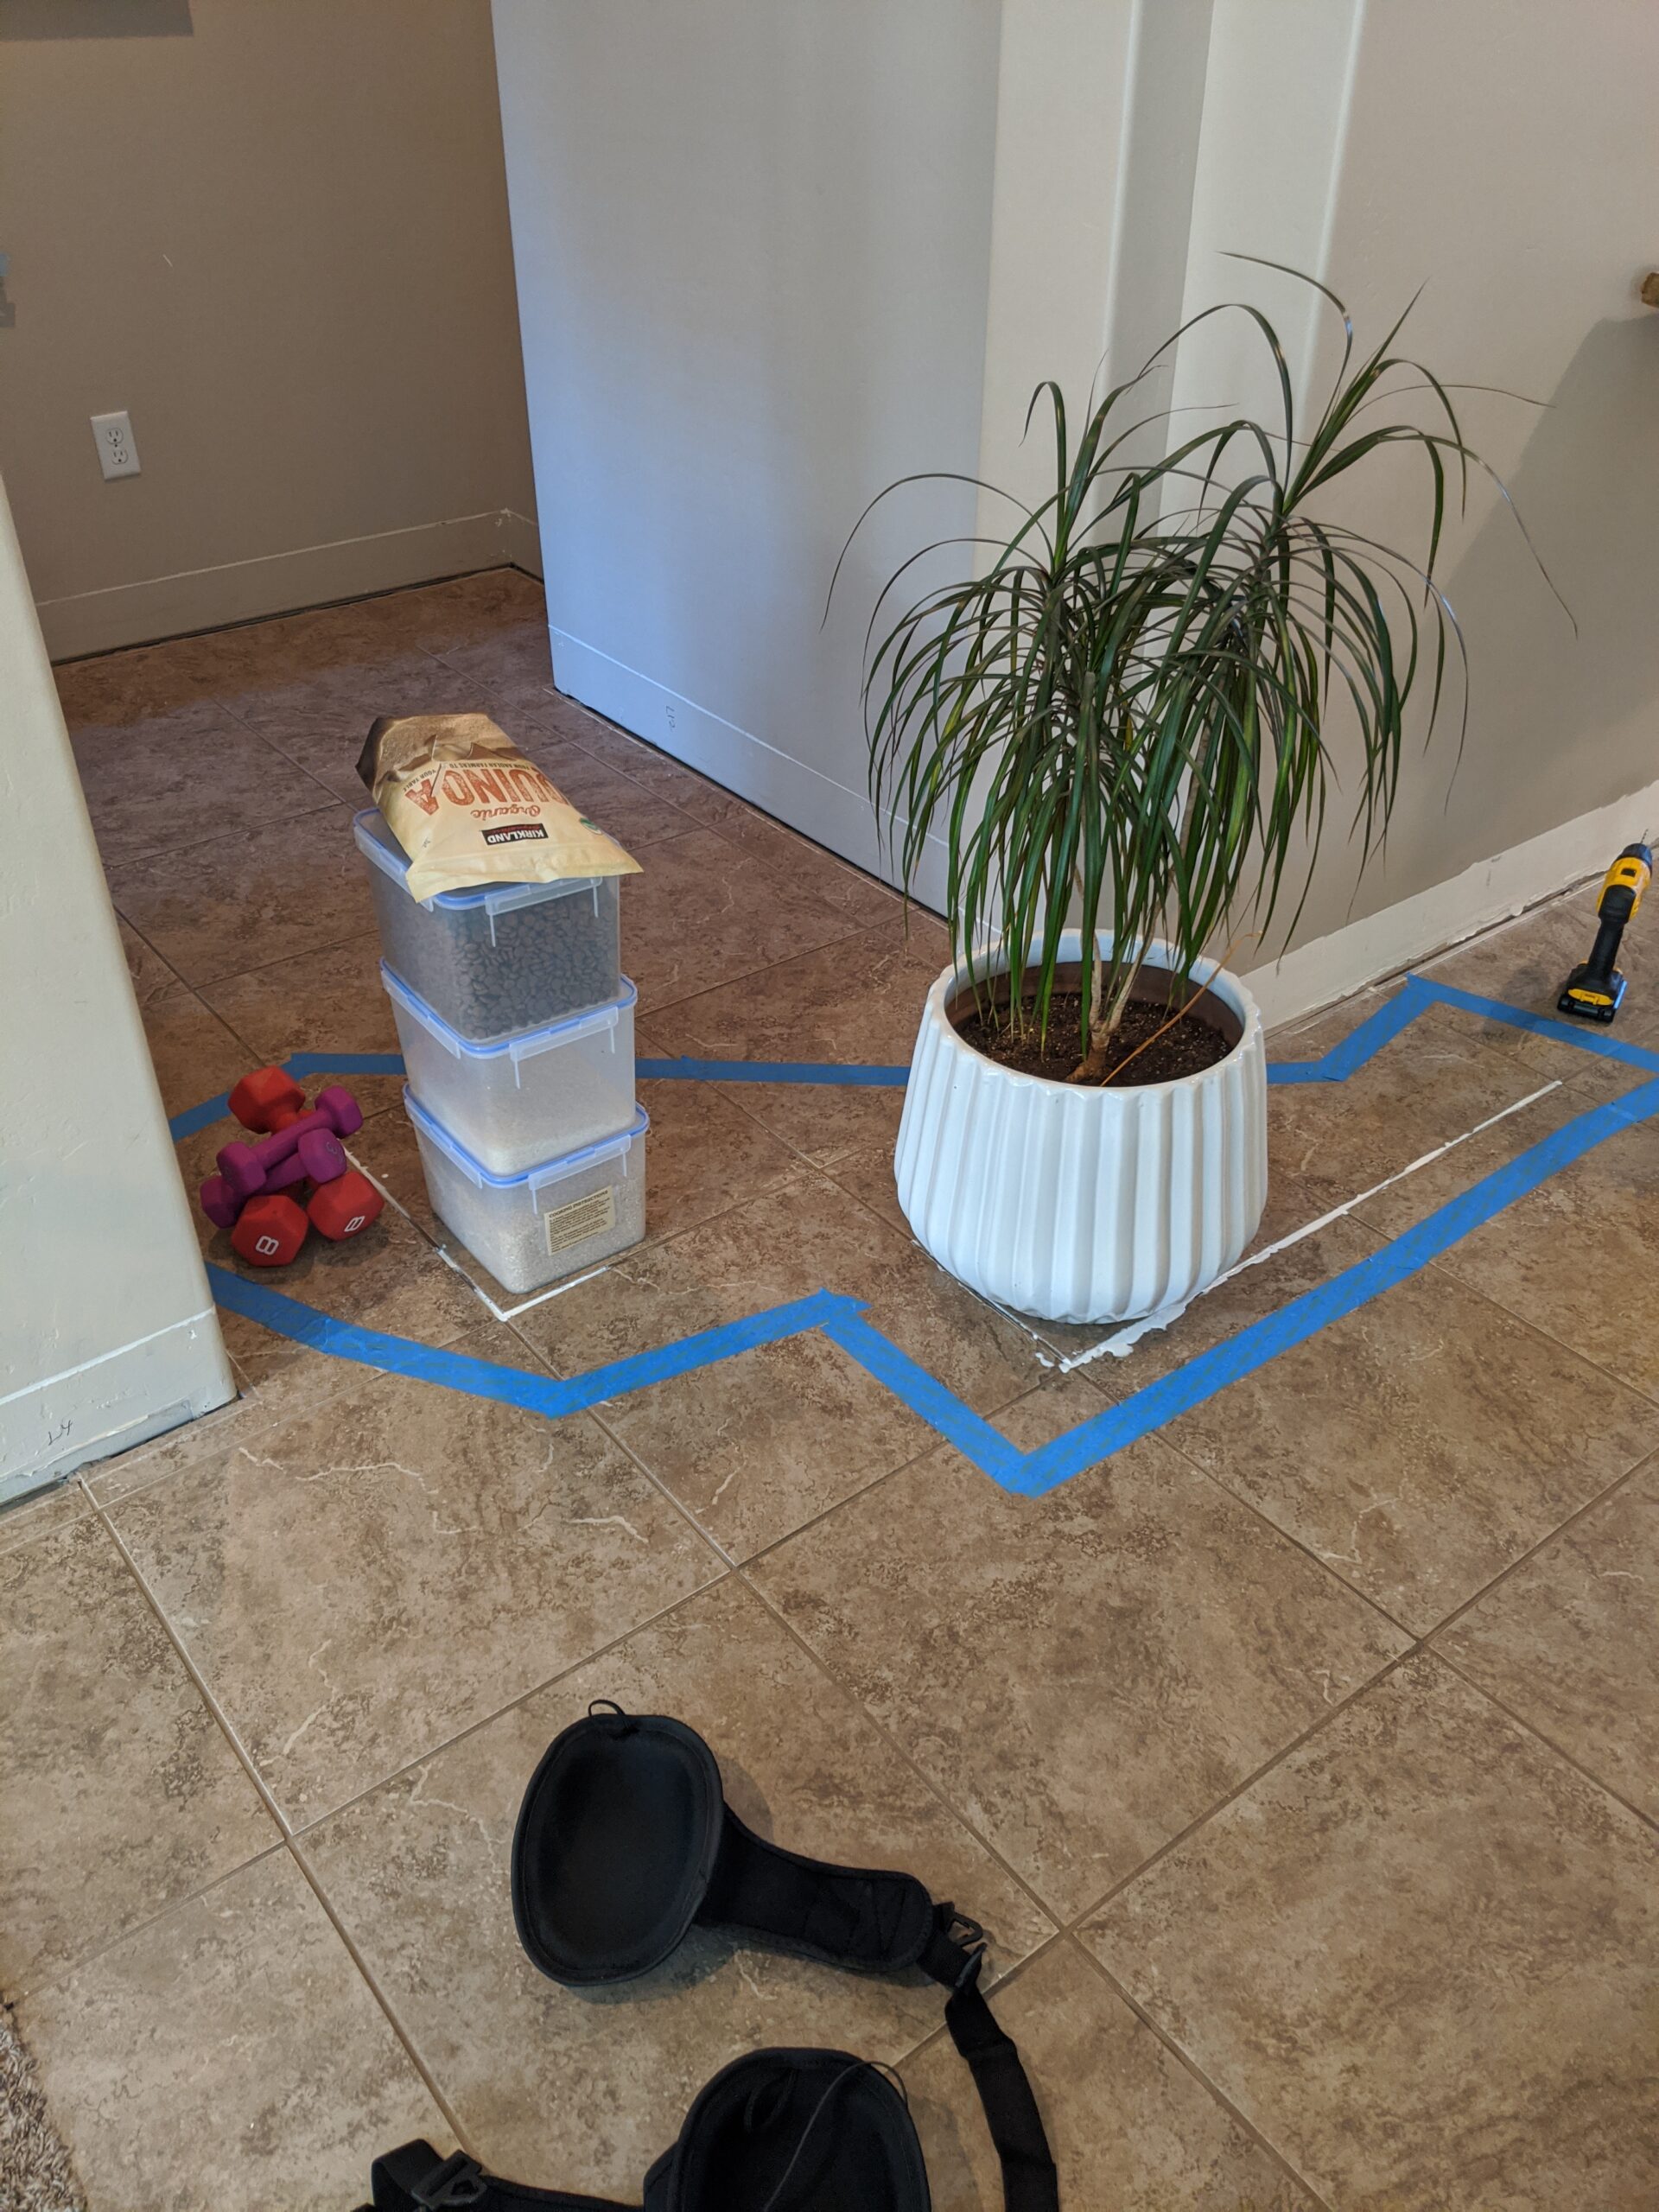
1. Move the Furniture
The first thing you’ll need to do is move all of your furniture and stuff off of the floors you’ll be redoing. We cleared out all of the little stuff and then moved all of the heavy, big stuff to the side of the room we would be doing last. (Then when we finished laying LVP on the first side of the room we moved the big furniture onto that finished side while we did the rest of the room. Hopefully that makes sense!) This allowed us to not have to move the heavy stuff too far or worry about it fitting between doorways.
2. Remove Baseboards
You’ll definitely need to take off all of your baseboards to get that clean, finished look at the end. We scored the caulk at the top of the baseboards with a utility knife. (This helps the baseboards pull away from the wall without ripping off your wall paint.)

Then we used a trim puller and hammer to pry them off the wall. (Invest in a set of good knee pads and you’ll thank me later! You will be on your knees a lot through this whole LVP flooring process. We waited a day in to get our knee pads and wished we had had them from the get go.) There were a couple of tiny baseboard pieces that were too narrow to fit the trim puller in there, so we resorted to using a flat head screw driver to pry them out.
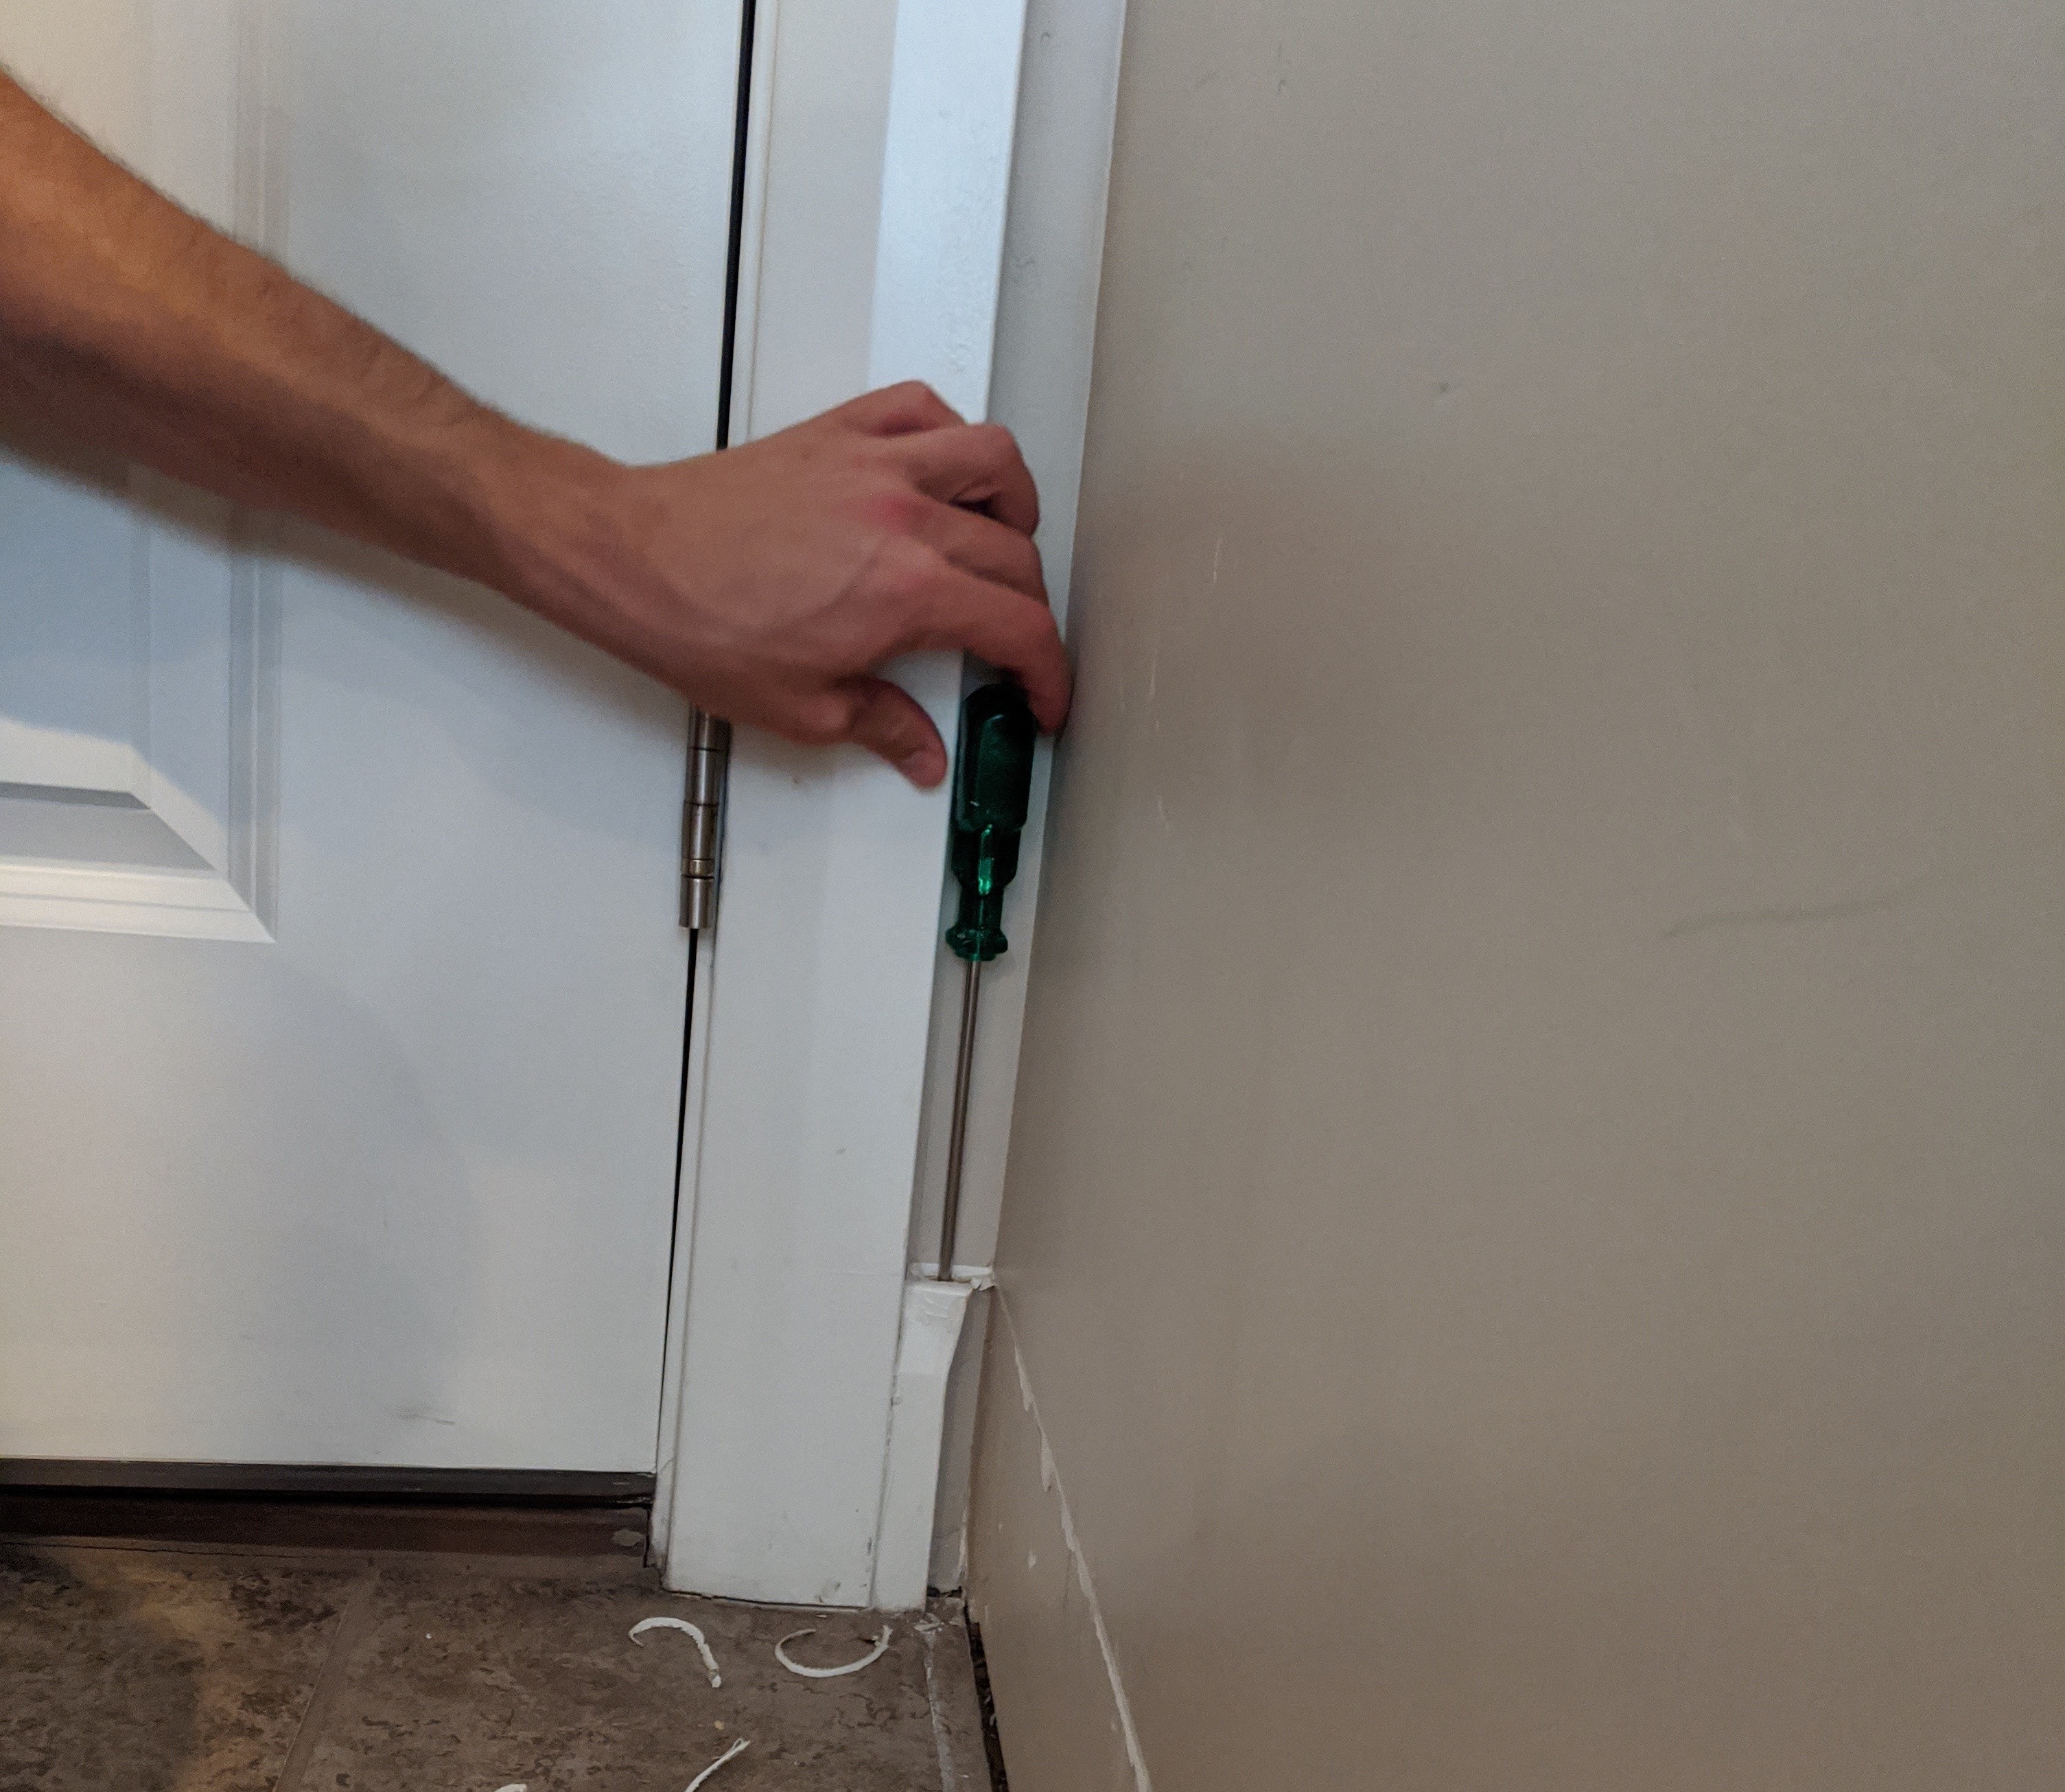
To help us easily put them back in the right place again, we took a sharpie pen and labeled the wall where they were and the back of the baseboard with matching numbers. SO glad we did this! It would have been such a headache trying to figure out which baseboard went on which wall otherwise.
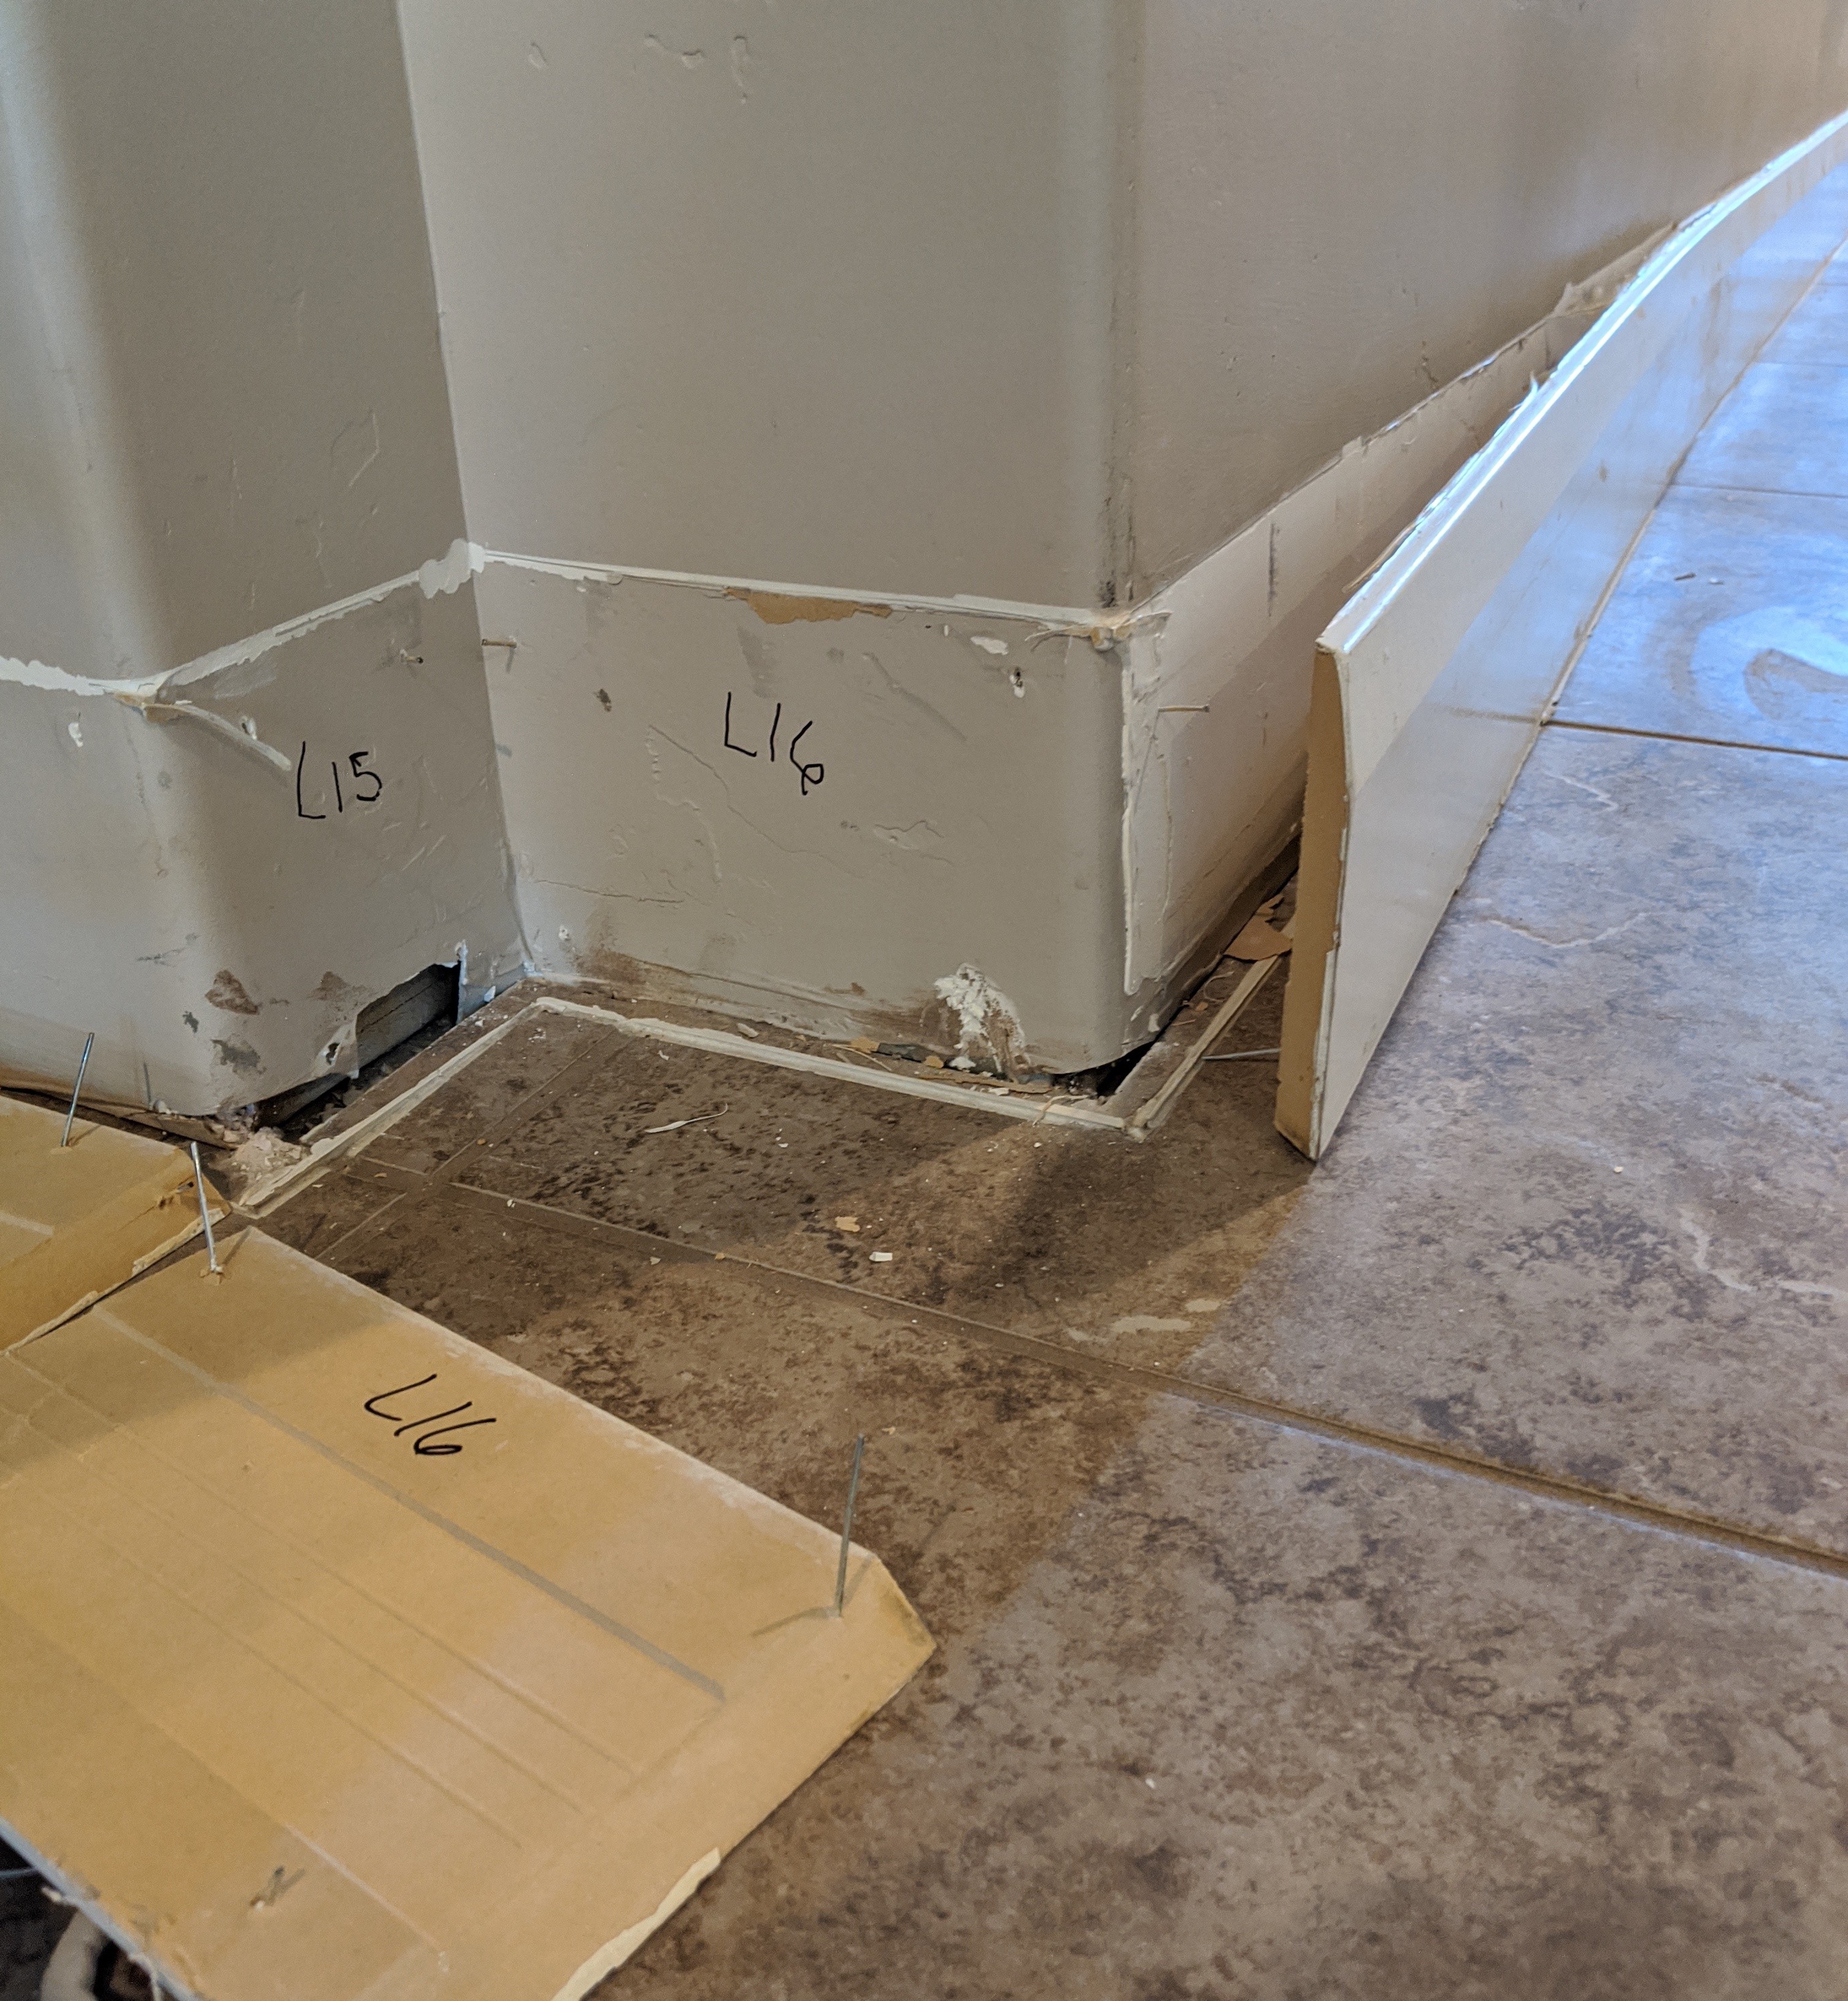
After the baseboards were moved, there was still residue caulk on the tile, so I took a putty knife (a 5 in 1 tool would have been better!) to scrape off that excess caulk.
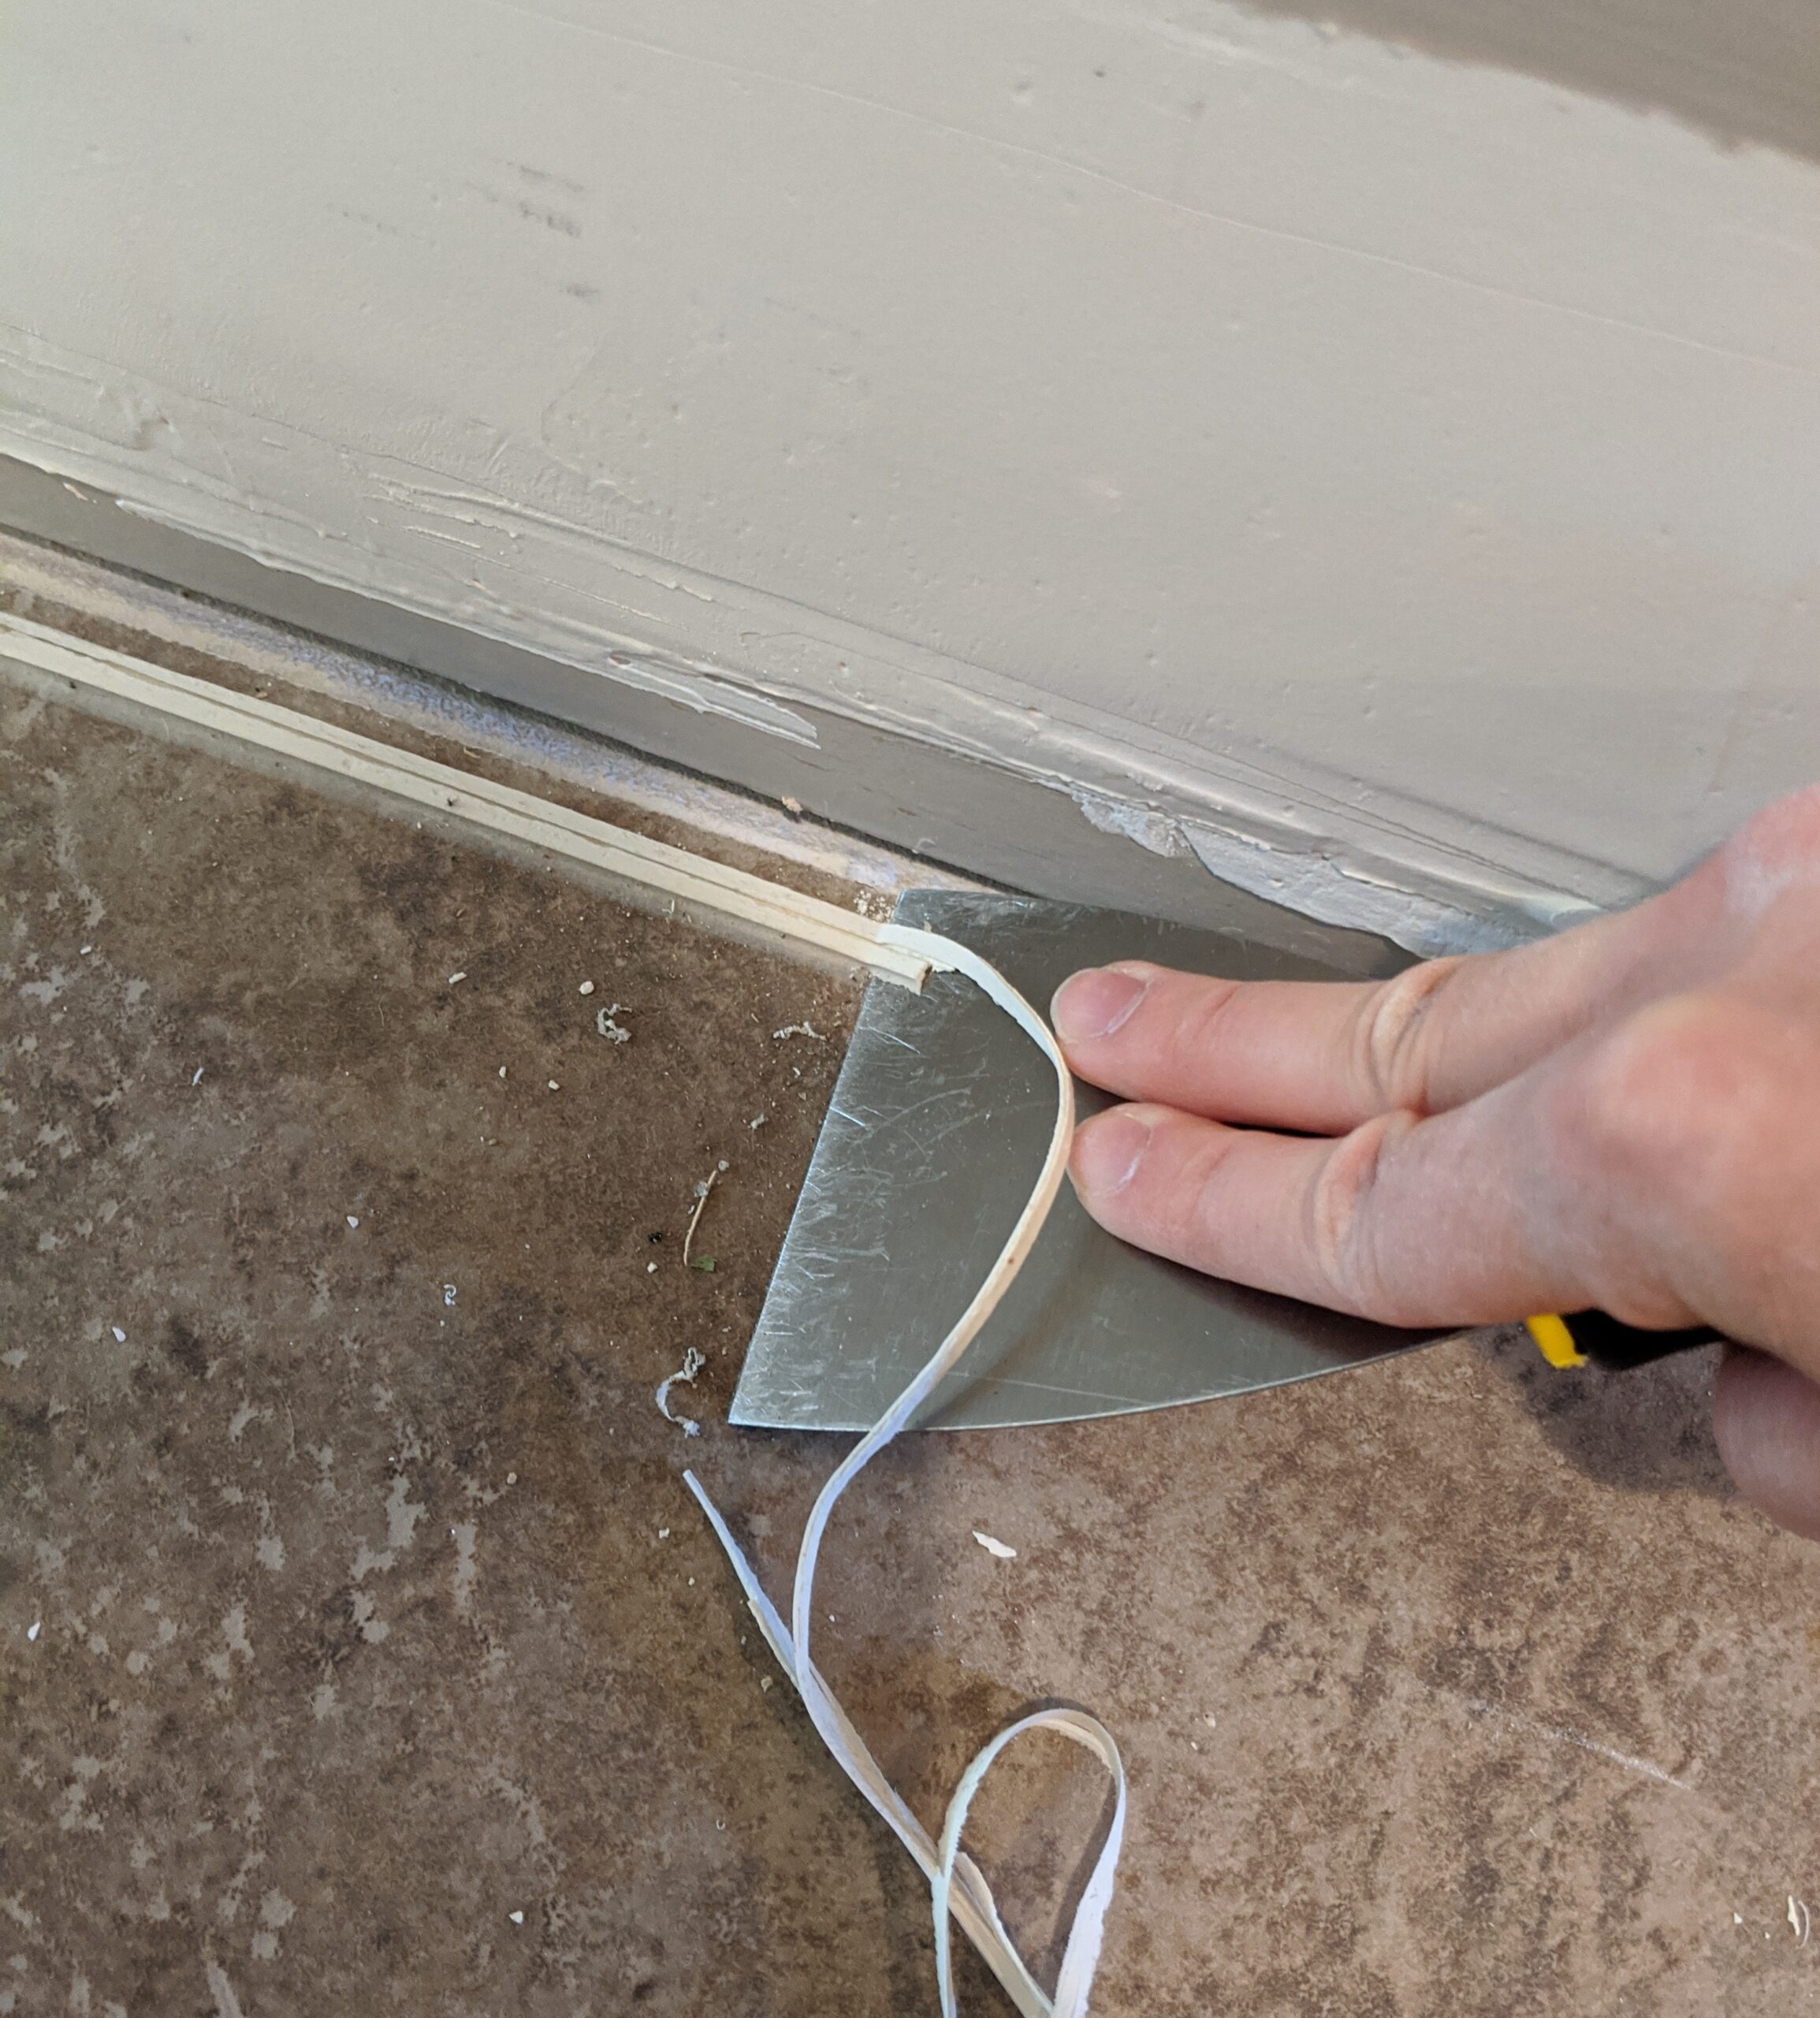
I also struggled pulling the little nails out of the back of the baseboards for a bit but then discovered a really easy way. I just took a pair of jaw locking pliers and rocked the tool back on itself using leverage to pop it out. Hopefully that makes sense! Way easier than pulling the nails with regular pliers or trying to clip them off.
3. Inspect the Floor
Essentially, you’ll want to make your surface as even as possible. Here are some problems we faced:
- Cracked grout
- Loose tiles
- Uneven tiles
- A section of carpet
And here’s how we fixed it.
4. Fix Cracked Grout and Loose Tiles
The nice part about fixing your cracked grout and loose tiles when laying LVP is that the fix doesn’t have to be pretty because it’ll all be covered up soon. I’m pretty sure the cracked grout caused the loose times in our home, but I’m not sure what cracked them. Maybe just the house settling a bit after being built? In any case, to stabilize the tiles we taped off the area of concern and then used Fix-A-Floor by following the directions on the bottle.
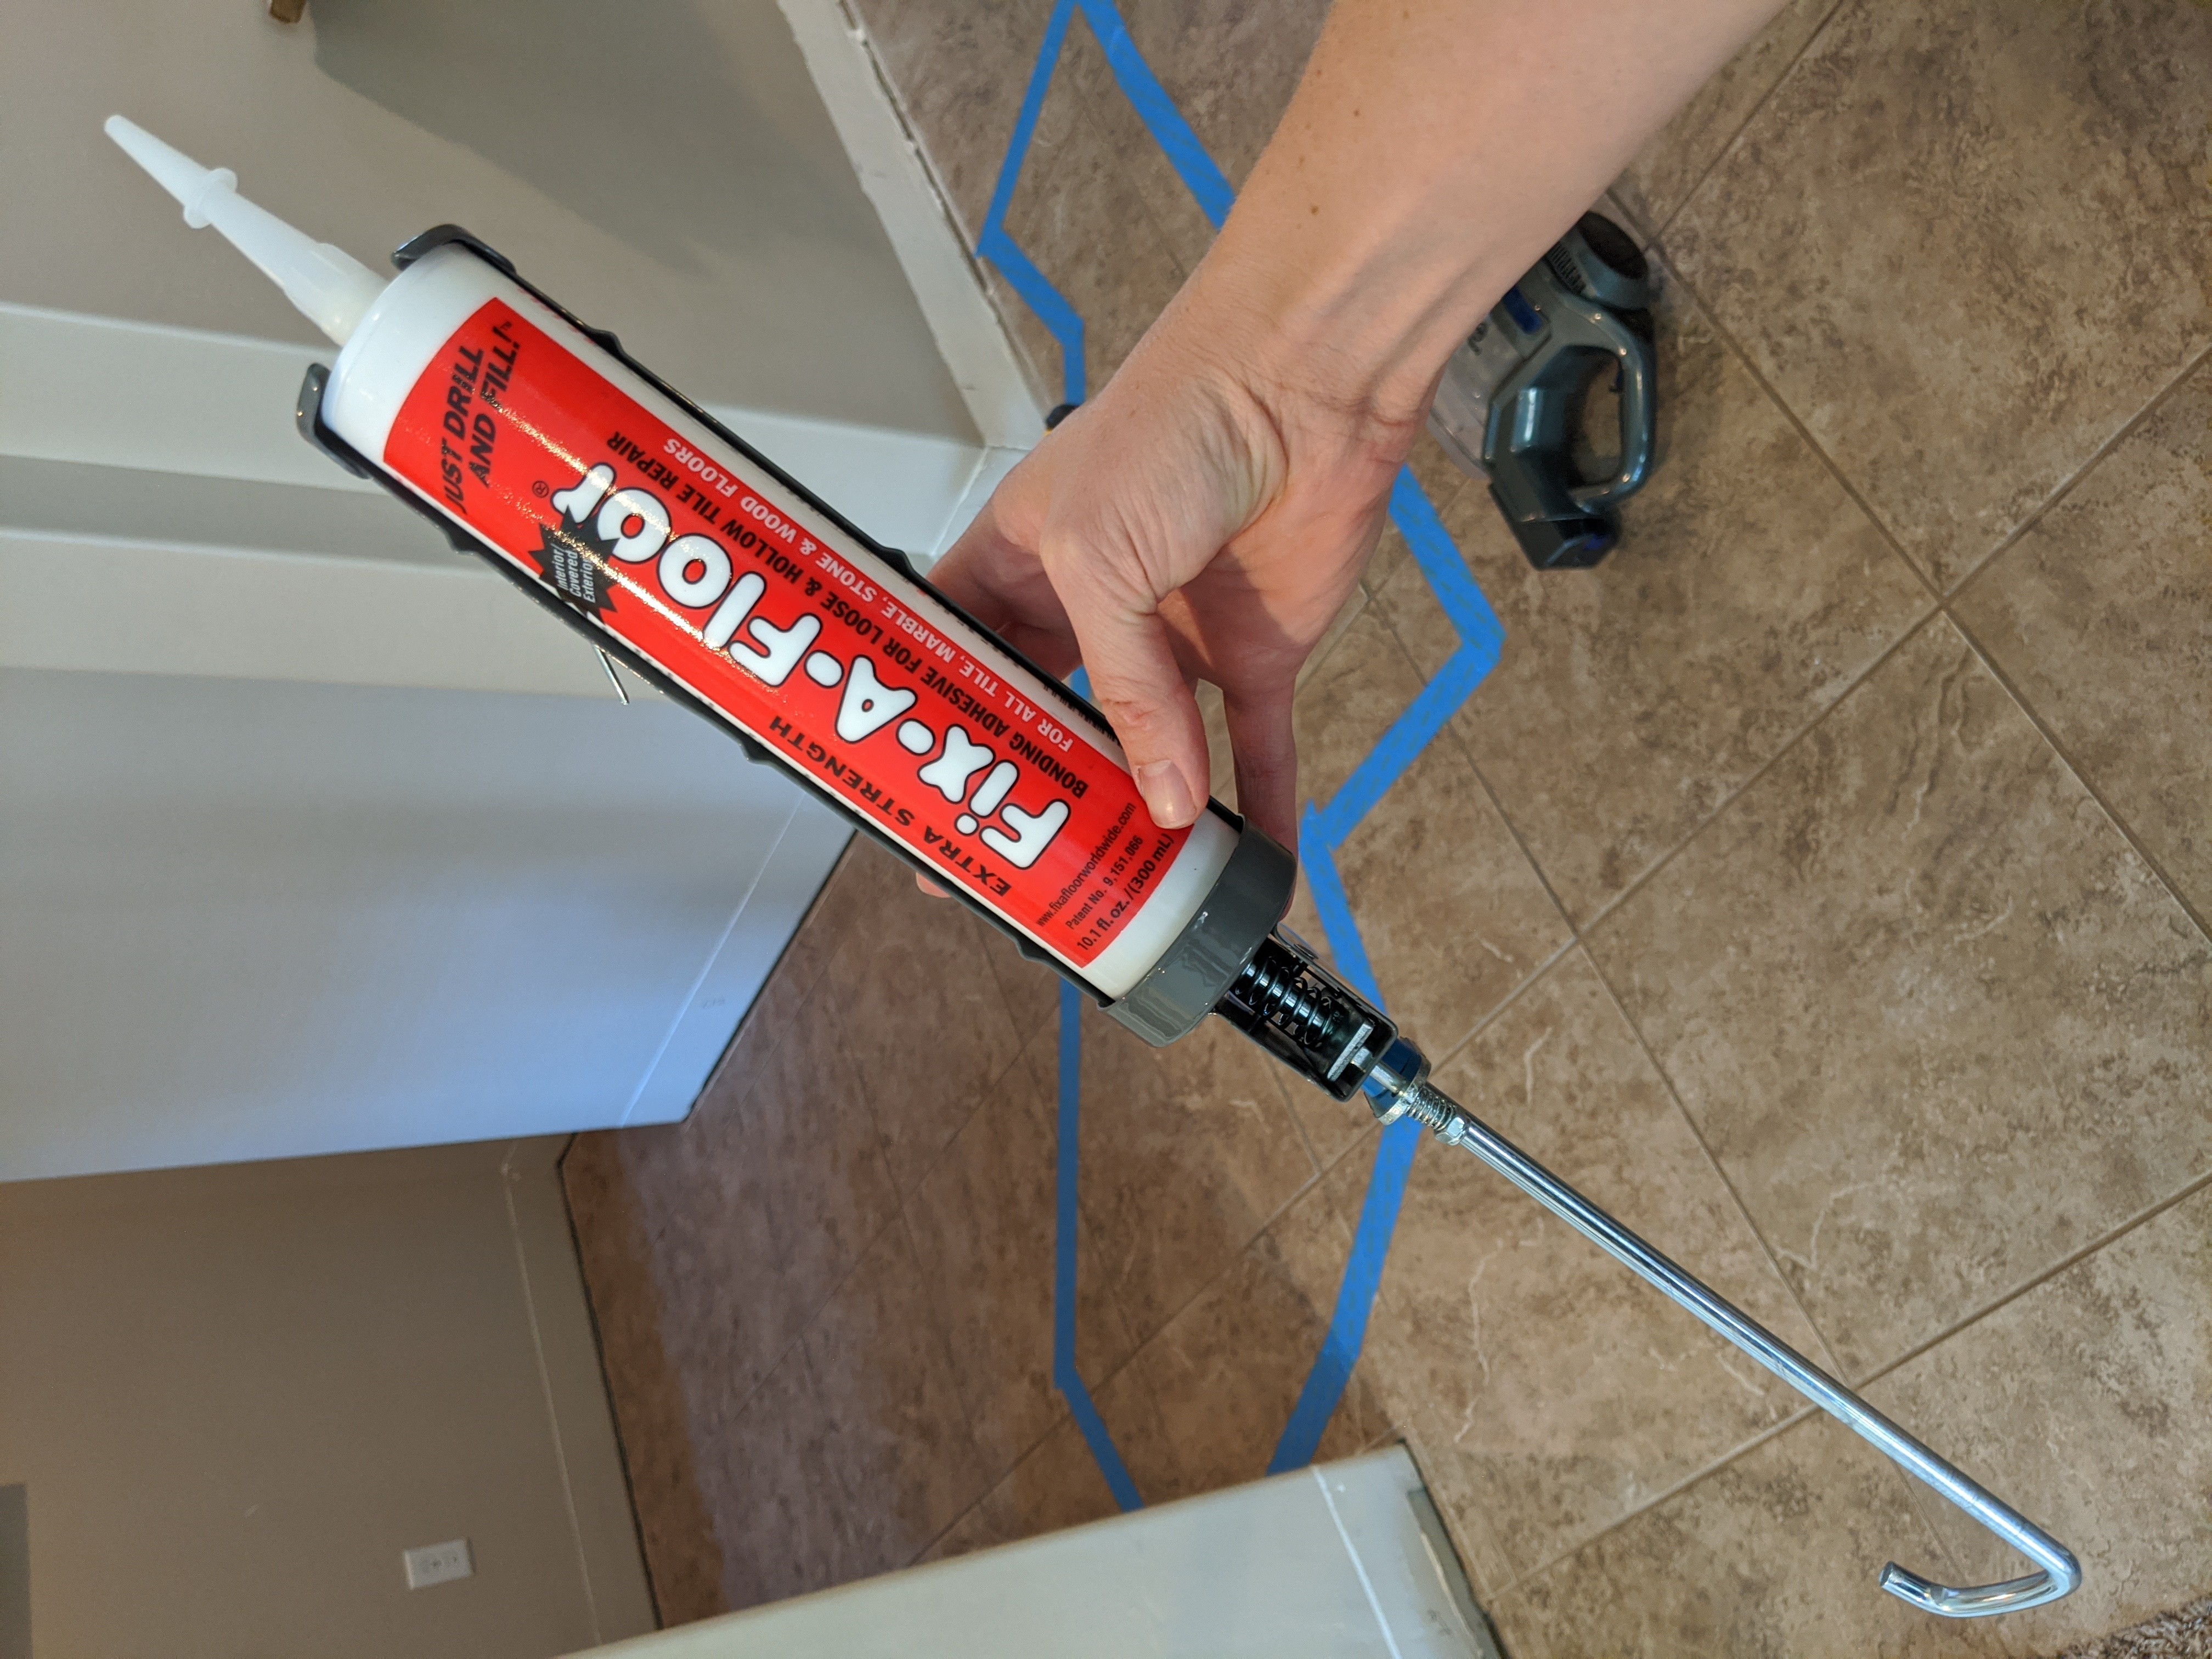
Basically, we drilled some holes in the loose grout and then squeezed this stuff into the holes. It’s supposed to sink in under the loose tile and work as a glue. We loaded the loose tiles with heavy stuff and left it there to dry for the recommended amount of time.
When it was dried, we removed the heavy objects and sure enough the tiles were no longer loose!
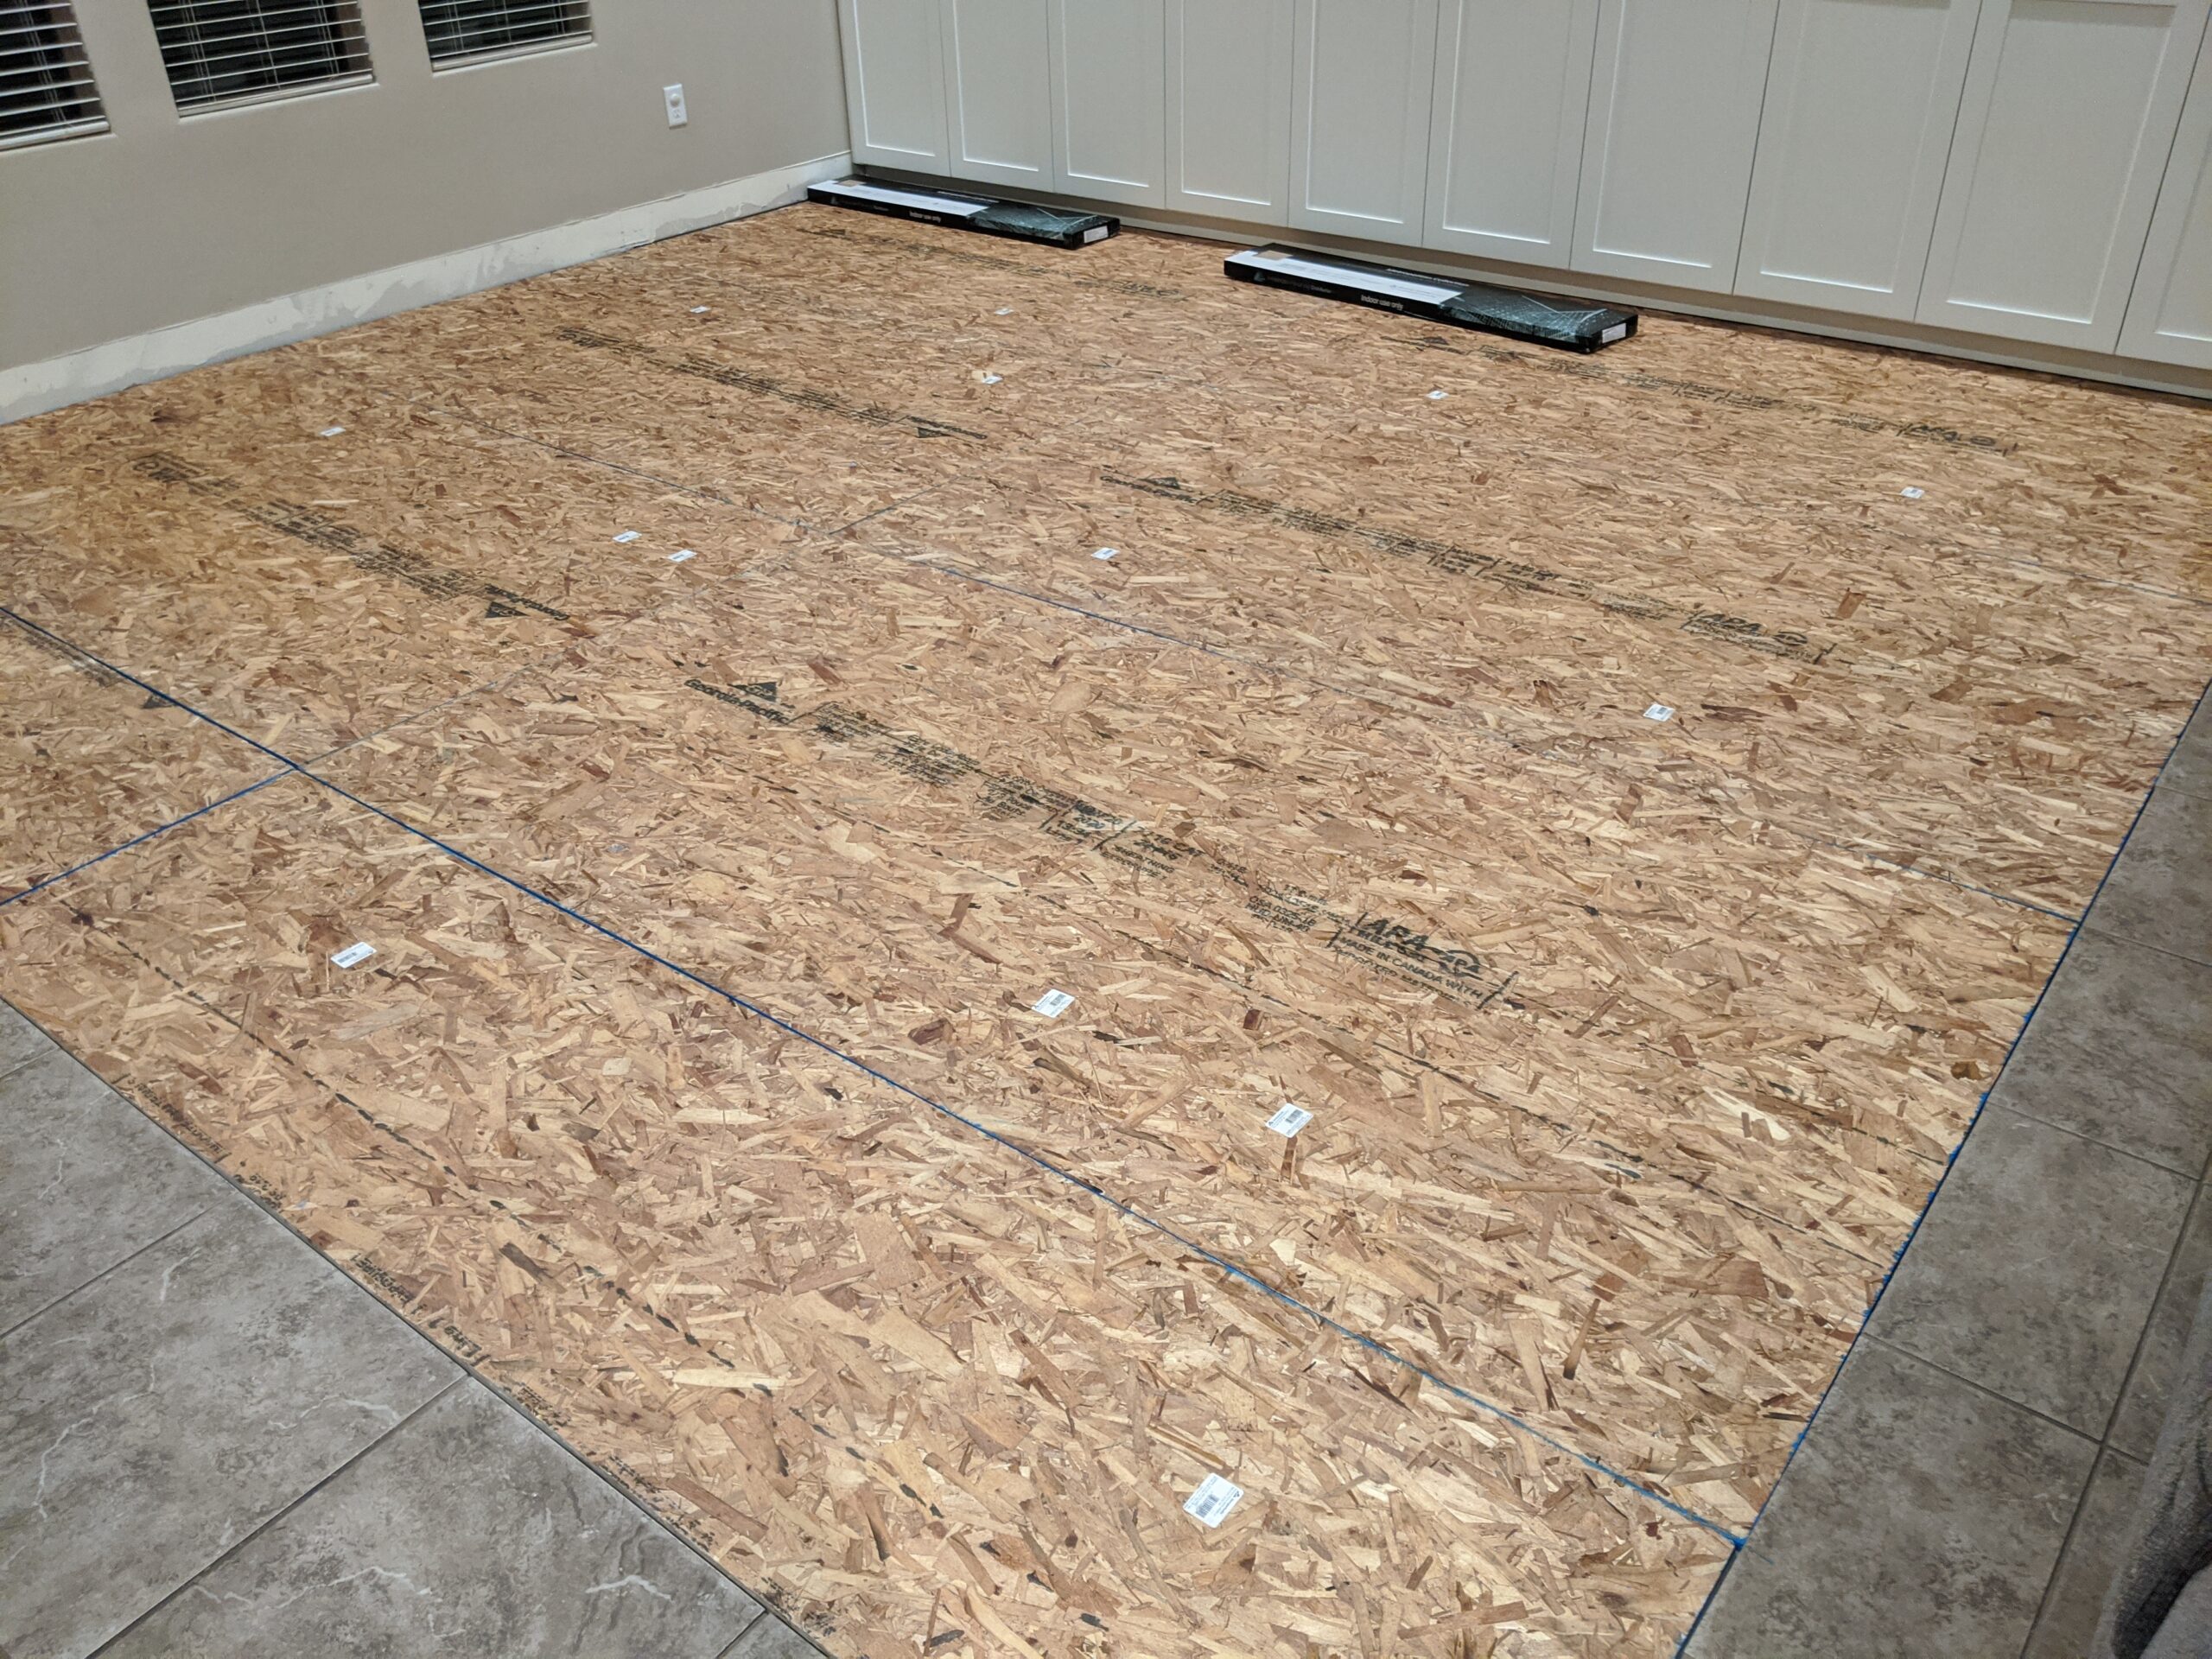
5. Pull up Carpet and Add a Wood Pad to Level
We wanted the LVP to be continuous from the hallway to the living room to the kitchen. However, our current living room area had a carpet patch. If you have a carpet patch then you may need to do this step too.
After ripping up our carpet and cleaning up the area a bit, we needed to find a way to raise the floor to the same height as the tile so that the LVP would sit at the same level. To do this, we found some boards at Home Depot that were the same height as the tile so by putting it in the concrete “carpet pad” spot, we were able to level out the floor.
We just cut the boards to size and used liquid nails to glue them to the cement. We started off a little sparse on the liquid nails and got more generous as we went. The places where we skimped on liquid nails we had to go back through and try and fill in with more where the boards moved when they were walked on. It made the whole process way harder than it needed to be. So learn from our mistake and be overly generous with the liquid nails from the beginning and you’ll save yourself some headache and time later on.
6. Even Out Raised Tiles
To do this, we used a very fancy (haha actually it was sketchy!) method. We’re obviously not experts, but this hack worked for us so you’re welcome to try it out too! We looked for the tiles that were raised compared to the tiles next to it. We knew that if we just laid LVP over it as is, then we’d be able to feel the heigh difference through the LVP. To help give it a more gradual change in height, we put layers and layers of duct tape down until it had a more gradual slope. I told you it was sketchy haha!
But like I said before, no one is going to be seeing what’s underneath the LVP. I really know what to feel for, so after we laid our LVP I can feel very slight slopes in the floor where we used this duct tape method, but we’ve had guests come and walk around on the spots we know has duct tape and they can’t even tell there is anything wrong. In my mind this was a total hack that really worked.
7. Clean and Vacuum
The last thing you need to do to prep your tile floors for laying LVP is clean them really well! You don’t want debris or crumbs or anything on your tile. If your floors are dirty then your LVP may make some squeaking sounds or crunching sounds when you step on them. There is one spot in our kitchen that we must have left some dirt under because it makes a little noise every time we step in a this certain spot. Save yourself some regret later and just really clean and vacuum (with a shop vac) the floors. (It’s hard keeping dust away in a construction zone, so you may have to re-vacuum here and there.)
Pin it for Later
I think that sums up what we did to prep for laying LVP over tile. There will be another blog post coming on the LVP installation process. In the meantime, hang tight and pin this to save it for later!