My husband and I are a perfect match, but we are differ quite a bit when it comes to hobbies and what we get energy from. He gets a thrill from participating in surgery, using tools, building cars, and going camping. I would rather run, watch a movie, do something crafty, and eat way too much cheesecake. One night we were talking about how we needed to find a fun activity that we both could enjoy doing while letting our individual talents shine. You know…a date night activity to do together.
The very next day, one of my husband’s fellow medical students commissioned a piece. Rather, she offered to pay us $40 to build an herb planter for her sister’s birthday present. Apparently the one she tried to buy on Etsy fell through and she was needing something quick and on-point. We were super excited to have found the very thing we were looking for! My husband could build the herb planter, and I could doll it up.
And thus our DIY herb planter came to be. Read below for our step-by-step directions on building your very own DIY herb planter! They’re great for growing herbs inside year-round!
*This page contains affiliate links. Your clicks and purchases help support The DIY Lighthouse at no extra charge to you.
DIY Herb Planter. Let’s break it down.
1. Design Your DIY Herb Planter
Now just relax. Building an herb planter requires no rocket science. It’s actually easier to do than I expected. It requires 5-8 pieces of wood: 4 for the sides, 1 for the bottom, and 0-3 for dividing the inside into separate herb sections. Our friends wanted to be able to grow 4 different kinds of herbs, so we used 8 pieces. Be sure when you are deicing on the dimensions that you consider where your DIY herb planter will go. (E.g., If you plan to put it on the windowsill, be especially careful to not design it too deep or it will hang over and look weird or, even worse, it’ll fall off.) Oh, and measure twice, cut once.
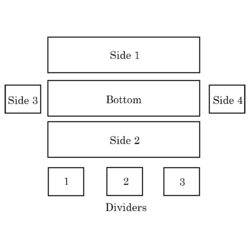
*Note: Sides 3 & 4 won’t be as long as the bottom is tall because you have to account for the depth of sides 1 & 2.
My favorite part: it can be personalized. Some things we did to personalize our DIY herb planter is use rope for the handles, a pewter stain for the entire planter, and black paint for the lettering. Feel free to let your creativity run wild!
2. Gather the Supplies
We went to Home Depot and bought 2 6 ft boards (these became the sides, bottom, and dividers), a small box of screws, ~2′ of thick rope, and an 8 oz. can of Pewter all-in-one weather proofing wood stain & sealer. All our supplies cost less than $15. Oh, and we had all our wood pieces ready to go before we left the store. (Home Depot will cut your boards for you with a power saw, so take advantage of that free service!)
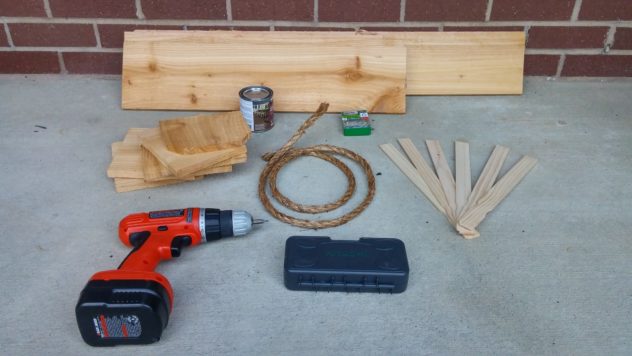
We already had a drill (like this one!), black paint, and paint brushes. If you choose to include text on your DIY herb planter, then you will also need either a printer + scissors or a Cameo Silhouette.
*DIY ON A BUDGET TIP: You can look for wood first at a local building materials thrift store (e.g., Habitat for Humanity) or for free on craigslist. You can also find paint & wood stains for FREE! (Click here to read our post DIY Hack: Get Paint for Free.)
P.S. I invested in a Cameo Silhouette a few months ago. This made the process much more automated. But you know what?! I still would have done this project without one using just a bit more elbow grease (aka a printer + scissors). Don’t feel like you have to have a Silhouette to make this project and make it look amazing.
3. Build Your Box
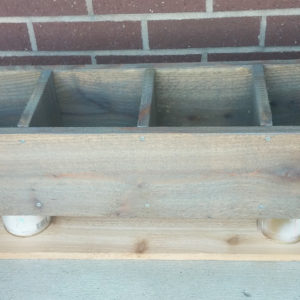
To tell you the truth, my husband got up early and did this step while I was sleeping. (Coolest husband ever award!) I know he used screws instead of nails so that the box would be sturdier and could handle more weight and ware & tare. He would recommend attaching sides 1 & 2 to the bottom first, then sides 3 & 4, and then inserting the dividers. Depending on the wood you used, your box might need a bit of sanding, but I also like the natural, rustic look of natural wood texture.
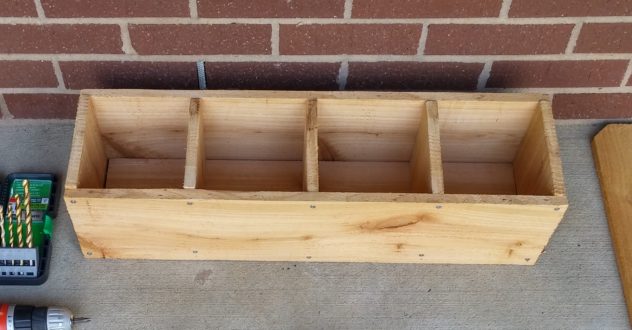
If you want the add rope handles like we did, be sure to drill two holes on either side of the planter box that are big enough for the rope to fit through. Doing it now is best because once it’s stained, you don’t want to be making new holes and exposing the original natural wood color. We totally didn’t do this, and it required another couple rounds of waiting for the stain to dry.
4. Apply the Stain
Once your DIY herb planter is assembled, the next thing you’ll want to do is stain it. We wanted a rustic, gray look, so we ended up buying the BEHR Semi-Transparent Weather Proofing All-in-One Wood Stain & Sealer in a pewter color. Reference the back of the stain for staining and drying instructions. It took two coats of stain to achieve the desired look. For in between coats, be sure to reference our post here about How to Keep Your Paintbrush from Drying Out.
5. Add the Finishing Touches
This is the funnest part…for me that is. It’s the beautifying and finalizing process. In this stage, you will add any decor elements (e.g., like rope handles and text) and prepare your DIY herb planter for potting soil and herbs.
Text
To add the text, I found the font I wanted and cut the word, “HERBS” onto vinyl using my Silhouette Cameo. (This is amazing Silhouette bundle has everything you need and is so worth the investment if you’re a DIYer! Click here.) Vinyl has a sticky backside that adheres to the surfaces and makes a greater stencil. Once my stencil was made, I simply positioned it on the planter box and used a paint brush and black paint to fill it in. Give it enough paint or stain that you don’t have to redo your work, but not too much that it will leak under the stencil or become blotchy. (If you have to step away mid-project, be sure to reference our post here about How to Keep Your Paintbrush from Drying Out.)
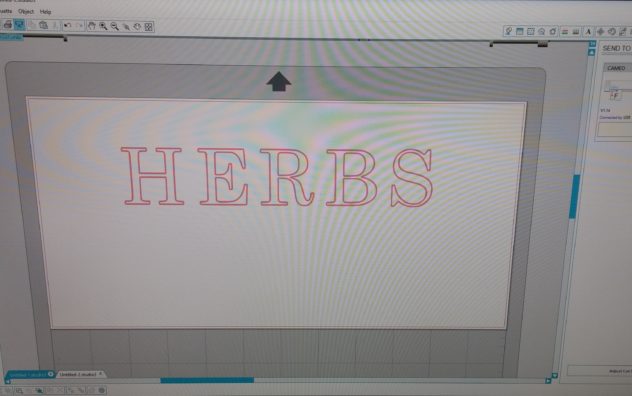
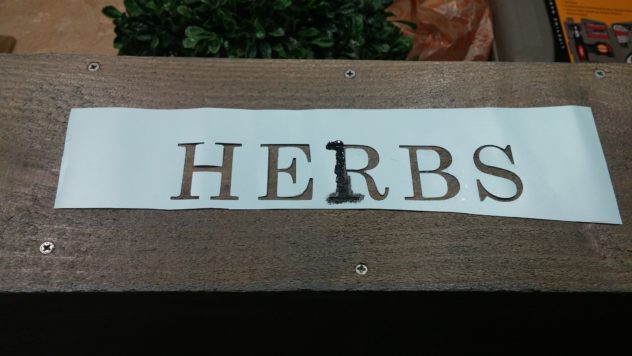
*Note: If you do not have a Silhouette, rather than using a stencil, you can cut out the letters by hand and trace them instead. Once the letters are traced, you can remove your trace and fill them in using a permanent marker or paint brush. A totally quicker option is to just free-hand it! If you do choose to free-hand it, I would still recommend having a printed version of the text right next to you so you can reference the positioning and design of the letters. This will help achieve more precise spacing.
When the paint or stain has been applied, remove your stencil or trace and allow it to fully dry.
Rope Handles
One tip for you if you’re adding rope handles: wrap duct tape around the end of the rope before pushing them through the holes you drilled. This will act as a needle point for any frayed ends. Not only does it make it easier to get the rope through, but it prevents further fraying.
Garage Bag Lining
To prevent the wood from rotting over time due to the water from the soil, it’s important to line the inside of each herb section. We did make sure that our stain included a sealer, but adding a liner will help the herb planter last even longer. Simply cut sections of a heavy-duty garage bag and either staple or hot glue them onto the bottom and sides of each herb box. Leave an inch or so of the stained wood exposed along the top. (You only want the liner where the soil will be.)
Aaaand boom goes the dynamite! This DIY Herb Planter becomes a rustic statement piece. And it grows herbs. It’s the gift that keeps on giving, right?!
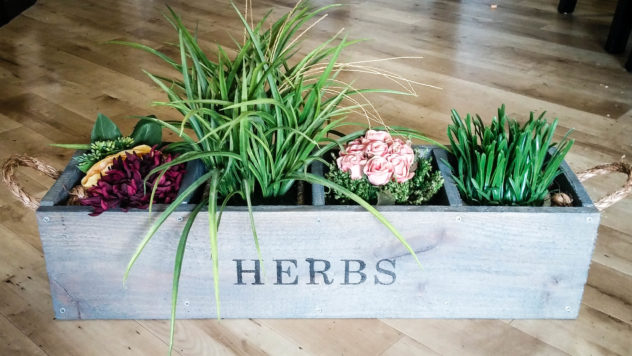
Please comment below and let us know how your rustic DIY herb planter turned out, or just let us know what your favorite herbs are to use in the kitchen.

